OpenGL from a 10,000ft view
This month marks 10 years since I started learning and using OpenGL, and what a ride has it been! I started off with basic OpenGL 1.1 back in the University under the advisory of my mentor and ex-Googler Gabriel Gambetta, then moving on to the programmable pipeline by teaching myself how to code shaders and then riding the wave of the mobile revolution with OpenGL ES on the iPhone.

As part of this process, I’ve also had the privilege of teaching OpenGL to others at one of the most important private universities back home. This exposed me to learn evermore about the API and improve my skills.
Rather than doing a retrospective post to commemorate the date, I though about doing something different. In this post I’m going to explain how OpenGL works from a 10,000ft view. I will lay the main concepts of how vertex and triangle data gets converted into pixels on the screen and, in the process, explain how a video card works. Let’s get started!
What is OpenGL
At the most basic level, OpenGL can be seen as a C API that allows a program to talk to the video driver and request operations or commands to be performed on the system’s video card.
So what is a video card? A video card (or GPU) is a special-purpose parallel computer, excellent at executing a list of instructions on multiple data at the same time. A video card has its own processors, its own memory and it’s good at performing one particular set of operations (namely, linear algebra) very very fast.
What OpenGL gives us is access to this device through a client/server metaphor where our program is the client that “uploads” commands and data to the video driver. The video driver, which is the server in this metaphor, buffers this data and, when the time is right, it will send it to the video card to execute it.
Our program’s “instance” inside the video driver is known as the OpenGL Context. The Context is our program’s counterpart in the video card and it holds all the data we’ve uploaded (including compiled shader programs) as well as a large set of global variables that control the graphics pipeline configuration. These variables comprise the OpenGL State and they’re the reason OpenGL is usually seen as a State Machine.
The Graphics Pipeline (Simplified)
Remember how I mentioned that the video card excels at performing a limited set of operations very very fast? Well, what are these operations?
The way the video card works is that data is fed into it through OpenGL and then it goes through a series of fixed steps that operate on it to generate, ultimately, a series of pixels. It is the job of the video card to determine which pixels should be painted and using which color. And that’s really all the video card does at the end of the day: paint pixels with colors.
The following image, taken from Wikipedia, shows a simplified view of the data processing pipeline that OpenGL defines.
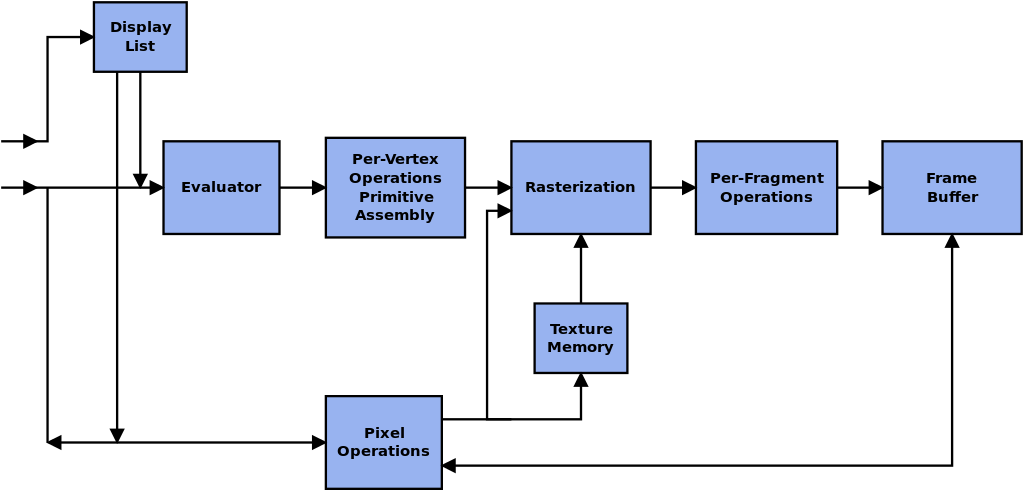
In this image, imagine the data coming from the user program. This diagram shows what is happening to this data inside the video card.
Here:
- Per-Vertex Operations: are operations that are applied to the vertex data supplied. This data can be coming in hot from main system memory or be already stored in video card memory. Here is where vertices are transformed from the format they were originally specified in into something we can draw on the screen. The most common scenario here is to take a piece of geometry from Object Space (the coordinate system the artist used), place it in front of a virtual “camera”, apply a perspective projection and adjust its coordinates. In the old days, here is where all transformation and lighting would take place. Nowadays, when a shader program is active, this stage is implemented by the user’s Vertex Shader.
- Primitive Assembly: here’s where OpenGL actually assembles whatever vertex data we supplied into its basic primitives (Triangle, Triangle Strip, Triangle Fan, Lines or Points, among others). This is important for the next step.
- Rasterization: is the process of taking a primitive and generating discrete pixels. It amounts to, given a shape, determining what pixels said shape covers. If the conditions are right, texture memory can be sampled here to speed up the texturing process.
- Per-Fragment Operations: are operations performed on would-be pixels. If there is a shader program active, this is implemented by the user in the fragment shader. Texture mapping operations take place here, as well as (usually) shading and any other operations that the user can control. After this stage, a number of operations take place based on the State Machine. These operations include depth testing, alpha testing and blend operations.
- Framebuffer: finally, this is the image we are rendering our pixels to. It is normally the screen, but we can also define a texture or a Render Target object that we could then sample to implement more complex effects. Shadow Mapping is a great example of this.
Sample OpenGL Program
Having taken a (very quick) look at OpenGL, let’s see what a simple OpenGL program might look like.
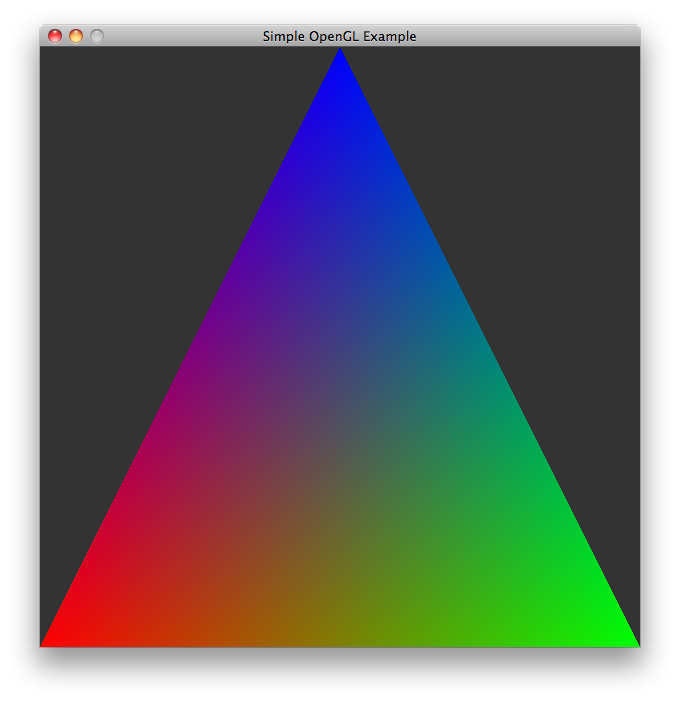
We are going to draw a colored triangle on the screen using a very simple script that shows the basic interaction between our program and the video card through OpenGL.
I’m using Python because I find that its super simple syntax helps put the focus on OpenGL. OpenGL is a C API however and, in production code, when working with OpenGL, we tend to use C or C++. There are other bindings available for Java and C# as well, but -mind you- these just marshal the calls into C and invoke the API directly.
This script can be divided in roughly 3 parts: initializing the window and OpenGL context, declaring our data to feed to the video card and a simple event loop. Don’t worry, I’ll break it down in the next section.
#!/opt/local/bin/python2.6
import pygame
from OpenGL.GL import *

def main():
	# Boilerplate code to get a window with a valid
	# OpenGL Context
	w, h = 600, 600
	pygame.init()
	pygame.display.set_caption("Simple OpenGL Example")
	scr = pygame.display.set_mode((w,h), pygame.OPENGL|pygame.DOUBLEBUF)

	glClearColor(0.2, 0.2, 0.2, 0.0)

	# Data that we are going to feed to the video card:
	vertices = [ \
		-1.0, -1.0, 0.0, \
		1.0, -1.0, 0.0,  \
		0.0, 1.0, 0.0 ]

	colors = [ \
		1.0, 0.0, 0.0, 1.0, \
		0.0, 1.0, 0.0, 1.0, \
		0.0, 0.0, 1.0, 1.0 ]


	# Here's the game loop, all our program does is
	# draw to a buffer, then show that buffer to the
	# user and read her input.
	done = False
	while not done:
		# Clear the framebuffer
		glClear(GL_COLOR_BUFFER_BIT)

		# Supply the video driver a pointer to our
		# data to be drawn:

		glVertexPointer(3, GL_FLOAT, 0, vertices)
		glEnableClientState(GL_VERTEX_ARRAY)

		glColorPointer(4, GL_FLOAT, 0, colors)
		glEnableClientState(GL_COLOR_ARRAY)

		# Now that all data has been set, we tell
		# OpenGL to draw it, and which primitive
		# our data describes. This will be used
		# at the primitive assembly stage.
		glDrawArrays(GL_TRIANGLES, 0, 3)

		# Clean up
		glDisableClientState(GL_COLOR_ARRAY)
		glDisableClientState(GL_VERTEX_ARRAY)

		# Show the framebuffer
		pygame.display.flip()

		# Process input:
		for evt in pygame.event.get():
			if evt.type == pygame.QUIT:
				done = True

if __name__ == "__main__":
	main()
If you’re familiar with OpenGL, you’ll notice I’m using mostly OpenGL 1.1 here. I find it’s a simple way to show the basic idea of how data is fed into the video card. Production-grade OpenGL will no doubt prefer to buffer data on the GPU and leverage shaders and other advanced rendering techniques to efficiently render a scene composed of thousands of triangles.
Also note that the data is in Python list objects and, therefore, the pyopengl biding is doing a lot of work behind the scenes here to convert it into the float arrays we need to supply to the video card.
In production code we would never do this, however, doing anything more efficient would require to start fiddling with pointer syntax that would undoubtedly make the code harder to read.
Putting it all together
Now, if you’re unfamiliar with OpenGL code, let’s see how our program is handled by the Graphics Pipeline.
		# Supply the video driver a pointer to our
		# data to be drawn:

		glVertexPointer(3, GL_FLOAT, 0, vertices)
		glEnableClientState(GL_VERTEX_ARRAY)

		glColorPointer(4, GL_FLOAT, 0, colors)
		glEnableClientState(GL_COLOR_ARRAY)
We start off by providing an array of vertices and colors to OpenGL, as well as a description of how this data is to be interpreted. Our calls to glVertexPointer and glColorPointer (in real life you would use glVertexAttribPointer instead) tells OpenGL how our numbers are to be interpreted. In the case of the vertex array, we say that each vertex is composed by 3 floats.
glEnableClientState is a function that tells OpenGL that it’s safe to read from the supplied array at the time of drawing.
		# Now that all data has been set, we tell
		# OpenGL to draw it, and which primitive
		# our data describes. This will be used
		# at the primitive assembly stage.
		glDrawArrays(GL_TRIANGLES, 0, 3)
glDrawArrays is the actual function that tells OpenGL to draw, and what to draw. In this case, we are telling it to draw triangles out of the data we’ve supplied.
After this call, vertex data will go through the per-vertex operations stage and then be handed off to the primitive assembly, which will effectively interpret the vertices as forming part of one (or more) triangles.
Next, the rasterization stage will determine which pixels on the framebuffer would be covered by our triangle and emit these pixels, which will then go to the per-fragment operations stage. The rasterization stage is also responsible for interpolating vertex data over the triangle, this is why we get a color degrade effect spanning the area of the triangle – it’s simply the interpolation of the colors at the three vertices.
This is all happening inside the video card in parallel to our event loop, that’s why we have no source code here to show.
		# Show the framebuffer
		pygame.display.flip()
Finally, after everything is said and done, the video card writes the resulting pixels on the framebuffer, and we then make it visible to the user by flipping the buffers.
In Closing and Future Thoughts
We’ve barely scratched the surface of what OpenGL is and can do. OpenGL is a big API that has been around for 20+ years and has been adding lots of new features as video card and video games companies continue to push for ever more realistic graphics.
Now, while 20+ years of backwards compatibility allow running old code almost unmodified on modern systems, design decisions accumulated over time tend to obscure the optimal path to performance, as well as to impose restrictions on applications that would benefit for more direct control of the video card.

These points, made by the Khronos group itself, have led to the design and development of a new graphics API standard called Vulkan. Vulkan is a break from the past that provides a slimmed down API more suitable for modern day hardware. In particular multi-threaded and mobile applications.
OpenGL, however, is not going away any time soon, and the plan for the Khronos group, at least for the time being, appears to be to offer both APIs side by side and let the developers choose the one more suitable to their problem at hand.
Additionally, with Apple focusing on Metal and Microsoft on DX12, OpenGL (in particular OpenGL ES 2.0) remains the only truly cross-platform API that can target almost every relevant device on the planet, be it an iPhone, an Android phone, a Windows PC, GNU/Linux or Mac.
Finally, the large body of knowledge surrounding 20+ years of OpenGL being around, coupled with OpenGL’s relative “simplicity” when compared to a lower-level API such as Vulkan, may make it a more interesting candidate for students learning their first hardware-accelerated 3D API.
As time marches on, OpenGL remains a strong contender, capable of pushing anything from AAA games (like Doom) to modern-day mobile 3D graphics and everything in-between. It is an API that has stood the test of time, and will continue to do so for many years to come.